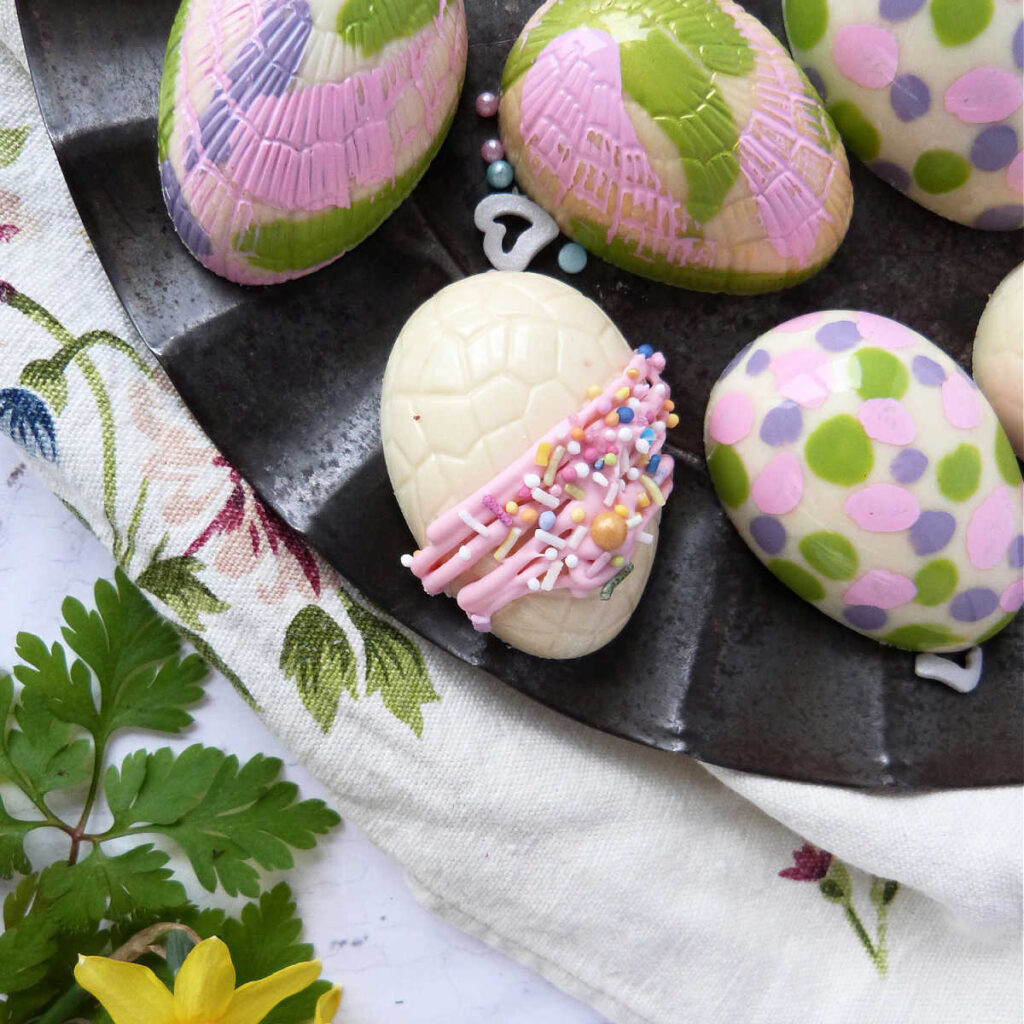
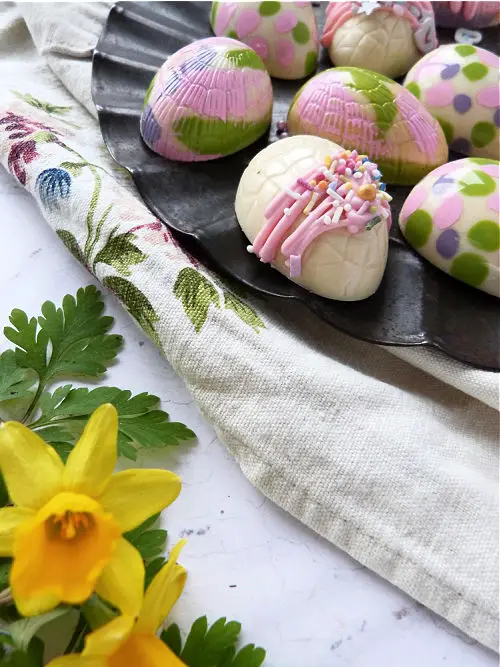
This white chocolate Easter Egg cakesicle recipe is a great alternative to traditional chocolate eggs. These eggs are filled with a cake filling, I’ve used lemon cake and lemon curd to make the mixture. This is also a basic recipe, that you can easily turn into different designs and flavours.
You can make these chocolate easter eggs in milk or dark chocolate and combine them with any kind of cake filling. The choice is yours!
Why make this recipe?
- Make great gifts for friends and family
- A different way to make cake pops. Using mould makes it easier than to shape the filling first and then dip in a melted chocolate.
What exactly is cakesicle?
I’m calling these Easter Eggs ‘cakesicles’ but that probably not quite correct. Cakesicle are usually made in a shape of popsicles (or icecreams) with a wooden stick, so that you can hold them when you eat them.
My Easter Eggs are in between cake pops (they are not in the shape of popsicle) and cakesicles (they are made in the mould like cakesicles).
You could easily make these without a mould by shaping the filling by hand into 3d eggs. You can leave them to firm up in the fridge and then coat them with melted chocolate or dip them in (you keep them on a cake pop stick).
My top tips on making this recipe successfully
- Make sure that the layer of chocolate in the mould is thick enough – it’s better to do 2 thin layers than to do 1 very thick one.
- When filling the eggs with the cake dough, leave about 3-5mm gap from the top of the mould to make sure that you can cap the chocolates (add the ‘bottom’ of the chocolates).
Any specialist equipment needed?
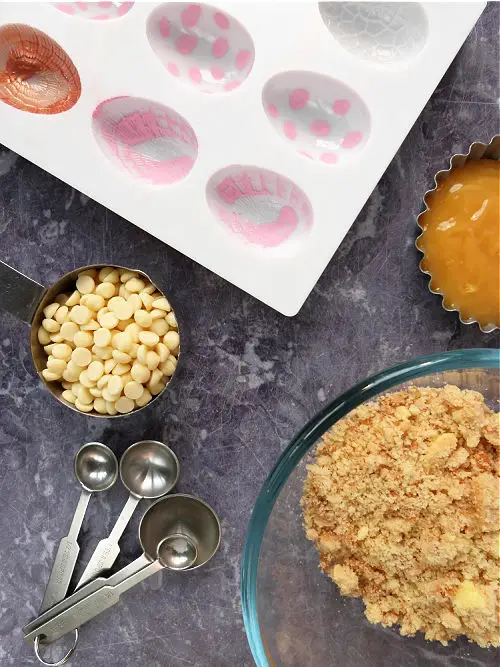
- Egg Chocolate Mould (can be silicone or polycarbonate mould or even a different type of mould)
- Bowls & Mixing spoons
- Scraper or spatula to scrape the chocolate
- Microwave/Bain-Marie to heat the chocolate

Ingredients & Possible Substitutions
Chocolate
I’ve used basic white chocolate bar for the cake mixture and white chocolate coverture for the outer layer of the Easter eggs. If you don’t have a white chocolate you can also use milk or dark chocolate or any other white chocolate substitute that’s suitable for chocolate moulding.
Cake
This recipe is perfect for any cake leftovers. I’ve used lemon cake, but madeira or vanilla cake is fine too. If you want to make the filling darker, use chocolate cake or coffee cake. You can also make my basic chocolate cupcake recipe and bake it in a 2 pound loaf tin, instead of cupcake tin.
As long as you use plain sponge cake, the flavour doesn’t really matter, just match it up with the best liquid ingredients to make the cake filling and par it up with complimenting or contrasting chocolate.
Lemon Curd
I’ve used lemon curd to go with my lemon theme, but you can use the same amount of double or single cream.
Sugar decorations
This is optional, but this will allow you to do lots of different finishes.
The method – Instructions
STEP 1
Gather all your ingredients and decide on your flavours. I’ve also decorated my moulds with coloured cocoa butter, but this is totally optional, so please don’t worry about that.
STEP 2
Melt the chocolate and the lemon curd, very slowly in the microwave or on a bain marie. Gently and slowly stir, but let sit to melt on it’s own. If you stir it when it’s hot, the chocolate filling (ganache) might split.
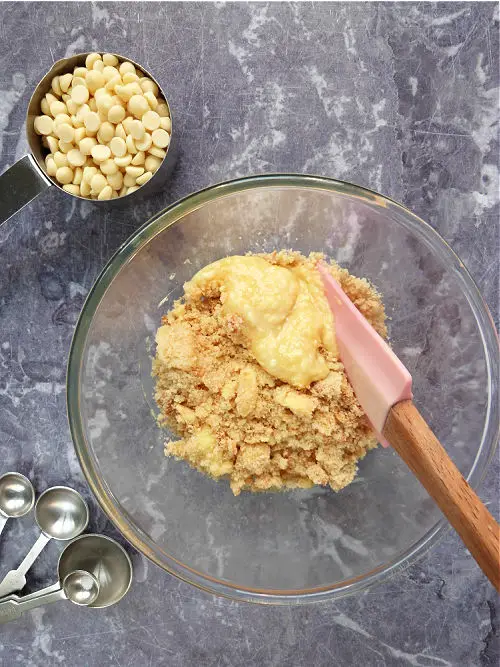
INGREDIENTS – CAKE CRUMBS, WHITE CHOCOLATE, LEMON CURD 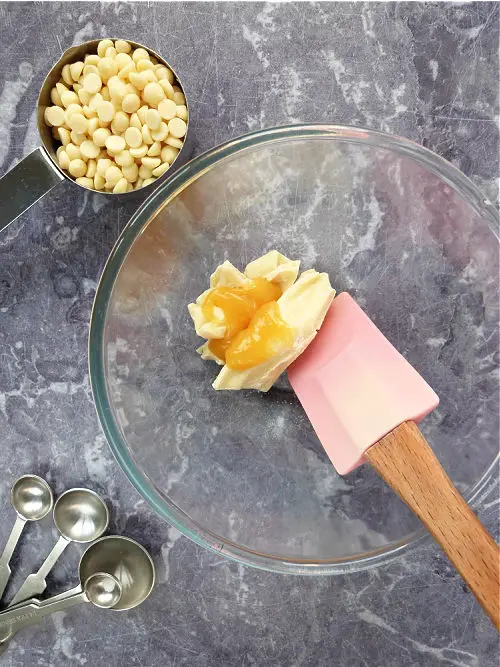
MELTING WHITE CHOCOLATE AND LEMON CURD
STEP 3
Add the crumbled cake to the bowl and pour over the melted white chocolate with lemon curd.
STEP 4
Mix everything together until you get a thick mixture resembling dough. It should be fairly firm, if it’s running too much, cool it down in the fridge for a little bit.
The dough is now ready to be shaped or pressed into the mould. If you don’t have a mould, you can easily shape the eggs with your hand and make them fully 3D.
COMBINE THE CAKE CRUMBS WITH MELTED CHOCOLATE AND LEMON CURD 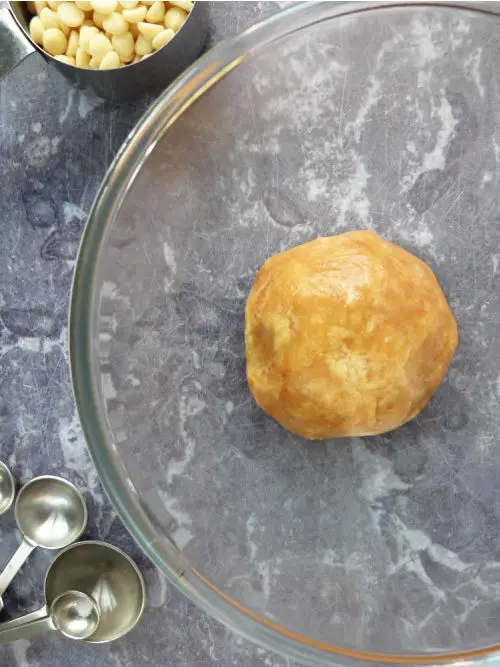
MAKE IT INTO A FIRM DOUGH
STEP 5
Melt the white chocolate slowly in the microwave or on a bain marie and very gently bring the white chocolate temperature to about 27C. It’s helpful to have a digital thermometer at this point to check the temperature, but if you don’t the chocolate needs to feel colder than your hand.
At this stage, I usually use the table tempering method to crystalise my chocolate to make the chocolate nice and strong. If you are not familiar with this technique, don’t worry too much and just stir the chocolate until it thickens a bit. If you want to find out more about the reasons why we temper chocolate, you can read my previous blog posts.
Once your chocolate is set (this takes usually about 15 min in the fridge) fill the Easter Eggs with your cake filling, making sure that you leave out a 3-5 mm gap from the top.
STEP 6
Cover the Easter Eggs with the rest of your melted chocolate and use spatula or a scraper to tidy up the top of the mould. You can also tap the mould to make the top nice and smooth. Place in the fridge and leave to set completely for 20-30 minutes.

FILL THE MOULD WITH CAKE FILLING 
SEALING THE FILLING WITH CHOCOLATE
STEP 7
Gently twist the mould from size to side to release the chocolate and use a tray to tap the chocolates out.
Bring to the room temperature before packing.
How else you can make this recipe?
I’ve used lemon flavour for the cake dough and white chocolate, because I wanted to make sure that the white chocolate looks like white. This combination could be quite sweet for some, so feel free to use dark or milk chocolate on the outside and dark or milk chocolate dough filling. The filling from my rum cake truffles is perfect for this.
More chocolate recipes


Allergies & dietary requirements
- Dairy Free – use dairy free cake mixture filling with dairy free cream instead of the lemon curd and dark chocolate (or dairy free milk chocolate)
- Vegan – use dairy free and eggless cake mixture and dairy free chocolate
- Gluten Free – use gluten free cake mixture and check the chocolate ingredients (it should be gluten free, but you never know)
Recipe size
I’ve made 12 X 5 cm long Easter eggs from this recipe (one mould). The final amount will depends on how deep your chocolate moulds are.
Scaling up or down this recipe
This recipe can be easily scale up or down, just make more or less of the cake pop dough filling and melt more or less chocolate to complete your moulds.
How to store cakesicles
Airtight container with a greaseproof paper in between each layer of the eggs should be enough to store these chocolate treats. They look great individually wrapped in a cellophane bag with a tied with a pretty ribbon if you want to give them out to your friends.
This recipe and me
Most of my recipes start quite innocently. I was looking for a way to use up lemon cake and then found a mould that was party decorated. I thought instead of making Easter Egg cake pops by hand, I could use the chocolate mould to make the egg shape more precise.
LIKE THIS RECIPE? PIN IT FOR LATER…

Why not stay in touch…
I hope you enjoy making this recipe and if you do, I’d love to know what you think! Let me know in the comments below or find me on Instagram or Facebook and add the hashtag #cocoaandheart so that I can see your post.
Or why not subscribe to my weekly newsletter with new recipes and baking tips straight to your mailbox.
Magdalena

Easter Egg Cakesicles
Ingredients
- 150 grams lemon cake or simple vanilla sponge cake
- 25 grams lemon curd or double cream
- 50 grams white chocolate or dark chocolate if you prefer less sweet version
- 250-300 grams white chocolate for the Easter Eggs
Instructions
- Place the cake sponge in a bowl and crumble the cake by rubbing it with your hands (it’s best to use catering food gloves for this)
- Heat the white chocolate and lemon curd together very slowly in microwave or bain marie.
- Add the melted chocolate and lemon curd into the cake crumbs and mix well until evenly combined. Set aside, whilst you work on the chocolate eggshells.
- Use your favourite method of chocolate tempering (see my notes above). If you are not familiar with this technique (or using a regular chocolate bar to melt), stir the chocolate until it thickens a bit.
- Use the melted chocolate to fill the chocolate mould and either do a two thin layers of chocolate or one slightly thicker. This could be done either by pouring the chocolate in and out again or by brushing the chocolate into the mould.
- Once your chocolate is set (this takes usually about 15 min in the fridge) fill the Easter Eggs with your cake filling, making sure that you leave out a 3-5 mm gap from the top.
- Cover the Easter Eggs with the rest of your melted chocolate and use spatula or a scraper to tidy up the top of the mould. You can also tap the mould to make the top nice and smooth.
- Refrigerate for 30 minutes until firm.
Find more amazing recipes over on #cookblogshare
Questions & Answers (Troubleshooting)
The chances are that the chocolate hasn’t set quite perfectly or wasn’t tempered well enough. There is plenty you can do to correct it next time (see my notes on chocolate tempering), but for now, the best thing to do is to place the mould in the freezer for 20-30 minutes to make sure the chocolate is perfectly hard.
After that twist the mould from side to side to release the chocolate and tap very sharply on kitchen table or similar on one side of the mould (at kind of 45 degrees slat). Don’t just bash it down, that won’t do anything – the trick is to tap from the side.
Hopefully your chocolate should come up, although it might not look it’s best. You can always dip it into more chocolate, roll it in a cocoa powder or decorate it with more melted chocolate and some sugar or chocolate decorations. It will still taste amazing and at the end of the day, that’s really what matters.
Ideally you want to use polycarbonate or strong plastic moulds, so that you can polish them with a cotton wool or paper kitchen towel.
The next important thing is to have your chocolate properly tempered and poured into your mould at the correct temperature for the chocolate. Again check my tempering notes above to see how you can do that.
I find that using mould considerably reduces the amount of time I’ve seen cakesicles to crack. It’s best to apply two thinner coats of chocolate to line the mould and leave to set each layer before adding the filling.
This is easier than you think. Follow the recipe for the cake pop filling and leave to firm up in the fridge. Shape the cake filling into whatever shape you like or use various kitchen utensils to shape or carve your cakesicle. Leave to set in the fridge. Melt and temper or prepare your chocolate and dip your cakesicles in (it helps to have them on a stick even if you remove it later). You can also use a fork to dip the cakesicles in the chocolate. Leave to set in the fridge. Add a second layer if the first layer looks too thin.


How very pretty and what a gorgeous idea. I haven’t made popsicles (or cake truffles as I call the for years. But they’re so delicious and a great way to use up leftover cake too. I don’t think mine could be as beautiful as yours in a million years, but I’ve pinned this to my Easter board to remind me for next year.
Thanks for sharing with #CookBlogShare
What a wonderful idea for a recipe, I love how you explain how your ideas come about, I’m very much the same and many recipe start out being one thing but my creativity takes over. Think my family will love me making them these treats any time of the year.