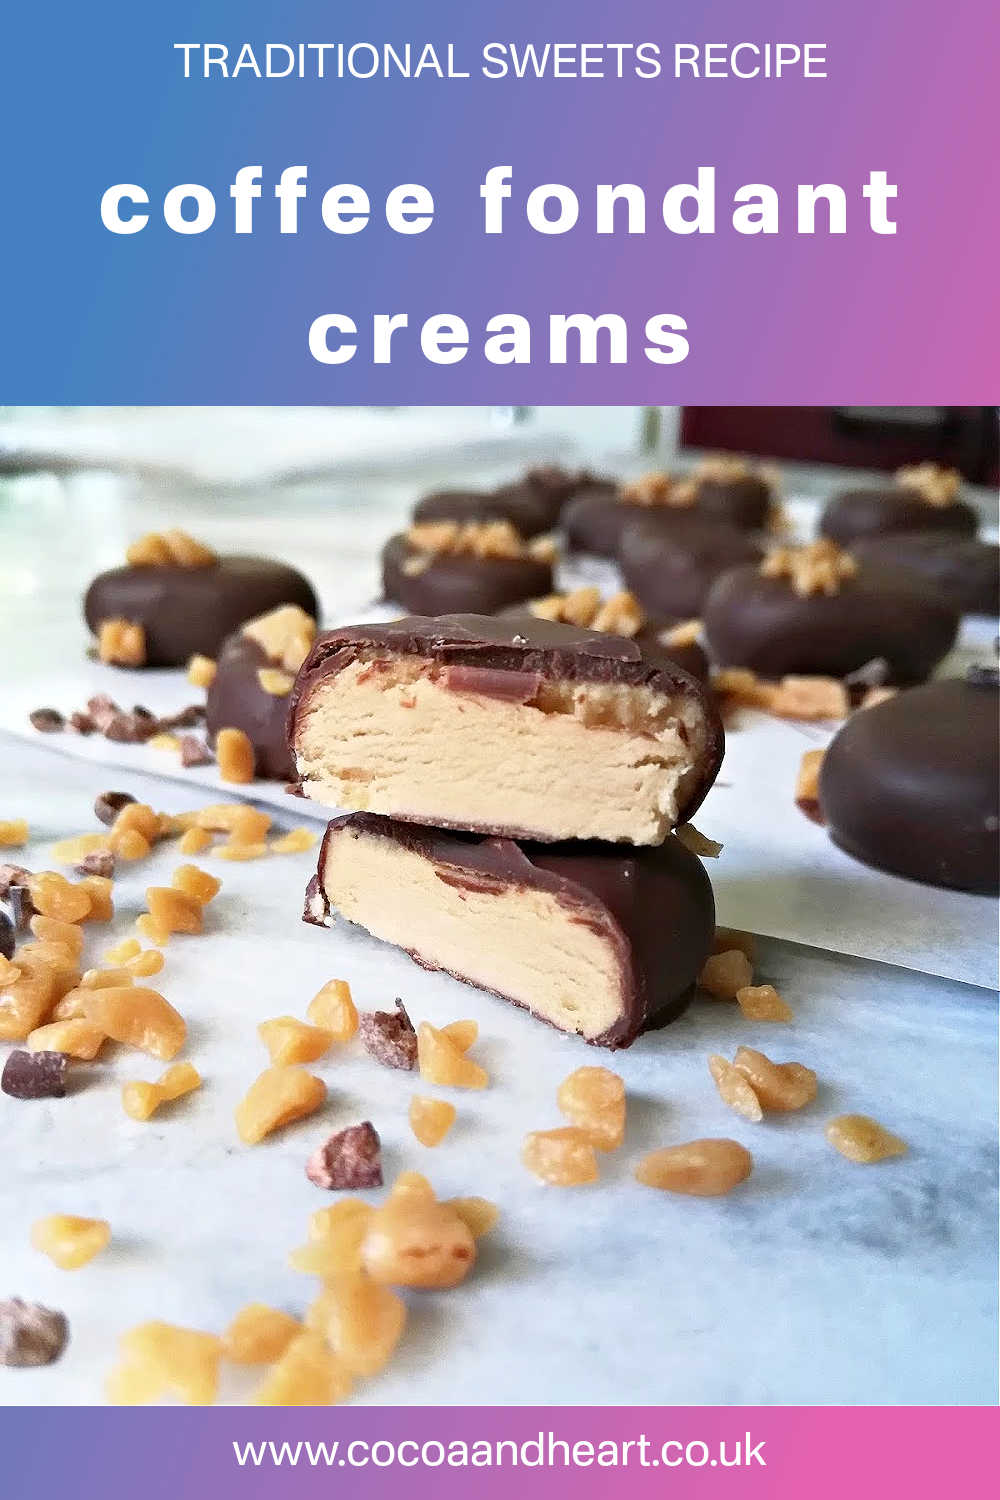
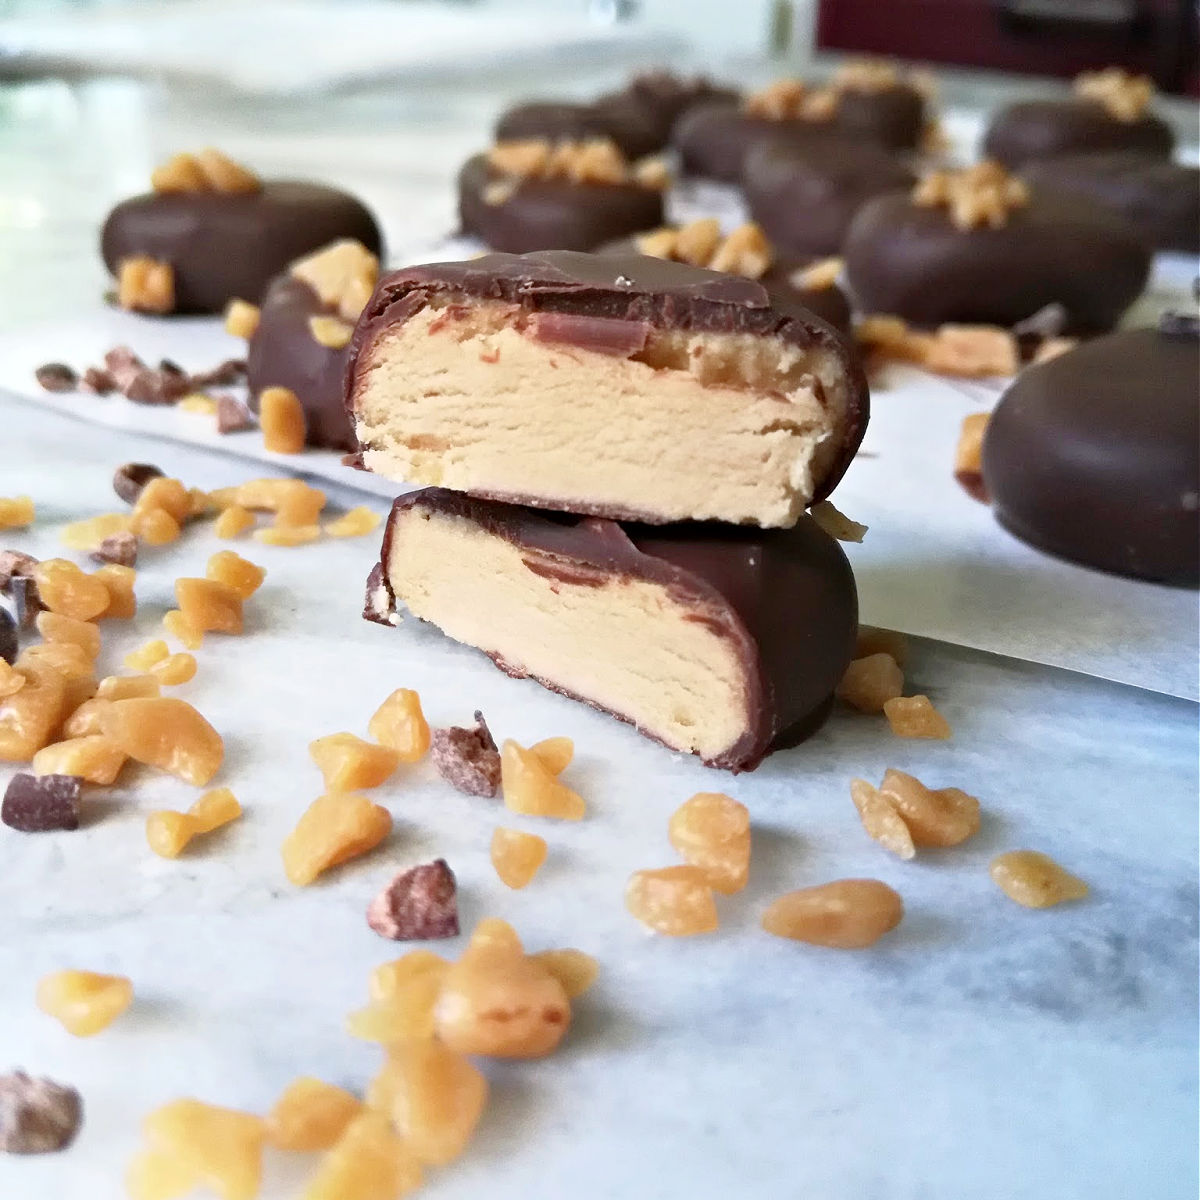
Coffee creams recipe made using the traditional boiling sugar method. Smooth fondant centre infused with coffee and enrobed in dark chocolate. Great as gifts and sweet treats for the whole family.
Why make this recipe?
- This is the traditional coffee fondant creams recipe, which involves boiling sugar - it's the real deal!
- Perfect 'melt in your mouth' texture
- Use this recipe to make any flavour of fondant creams you like
PIN THIS RECIPE TO KEEP FOR LATER
MORE TRADITIONAL SWEETS RECIPES
What exactly are fondant coffee creams?
Fondant creams are basically flavoured fondants, usually made with different flavours - peppermint being the most know flavour.
They are usually dipped in chocolate and sold as traditional confectionery. Traditional flavours also include violet or rose.
Fry's chocolate company was famous for their chocolate, orange or strawberry fondant creams which were made into a long thin chocolate bar.
I think that fondant creams are coming back in fashion, as I've seen them selling in quite a few different artisan chocolate shops. Since these sweets are still not exactly mainstream, the most common flavours are still violet, rose or peppermint.
My top tips on making coffee fondant creams successfully
Measure out all the ingredients correctly, including the glucose (it's so easy to add way too much of this sticky stuff)
Don't start to boil the sugar until all sugar crystals have dissolved (if you do, the sugar will re-crystalise back)
Don't leave the sugar stand for too long after you've added the flavour. If the sugar cools down too much, the mixture becomes too crumbly and won't form smooth fondant.
What makes this recipe work
Using caster sugar (as it has smaller crystals)
Adding a tiny pinch of salt to help the overall sweet coffee flavour
Enrobing the coffee fondant creams in very dark chocolate. Try something like 70-80% cocoa solids coverture (chocolate) to counteract the sweetness of the fondant
Any specialist equipment needed?
- Thermometer - digital or jam making one
- Dipping forks (but you can use regular forks if you don't have any)
- Medium size saucepan
- electric whisk hand-held or mixer
- pastry brush
- bowls for mixing & melting chocolate
- kitchen fork or chocolate dipping forks
- baking tray lined with greaseproof paper
Time saving tip
The coffee fondant creams mixture does need to rest ( to allow the sugar crystals to cure and mature), so I find it easier to make the fondant centre of the cream in the evening and then continue with the recipe the following morning.
The fondant filling can stay in the fridge (wrapped in clingfilm) for 1-2 days, if you want to make this recipe in two different stages.

Ingredients for traditional coffee fondant creams recipe
Sugar
I use caster (fine) white sugar for this recipe. I think that granulated sugar would be fine too, but I've not tested this recipe with it. If you do, please make sure that you let the sugar crystals to dissolve completely before you start to boil the sugar.
Caster sugar from cane sugar is better than beet sugar, but don't worry too much if you can't get hold of it. In the UK, pretty much all the supermarket's sugar is UK grown, which means it's from beet.
I prefer to use white sugar for this recipe, as it's neutral and the flavour comes out the best. I wouldn't recommend using strongly flavoured sugars such as coconut sugar unless it works with your chosen flavour (for example rich coconut or caramel flavour)
Glucose
You'll need one tablespoon of liquid glucose, which you can find in most supermarkets.
You can also use clear corn syrup if you have it, but since glucose is a bit thicker you might need to adjust the amount of water and the corn syrup.
Cream of tartar
You only need a generous pinch of cream of tartar for this recipe. You'll find cream of tartar in baking section of your supermarket.
It's usually used for whipping egg whites, but in our recipe, we need it because it prevents the sugar crystals to re-crystalise and keeps our coffee fondant creams lovely and creamy!
If you can't get hold of cream of tartar, leave it out and just make sure that you dissolve all the sugar before you start boiling it.
Water
Filtered or boiled water is best as you want to make sure that there is as few minerals present as possible. Certain minerals (like iron) can make the sugar mixture unnecessarily yellow in the process and we want to make sure that our fondant creams are as clear as possible.
Coffee flavour
I choose coffee flavour for this recipe, partly because I simply love the coffee and chocolate flavour combination, but also because you can use regular instant coffee granules to flavour this traditional confectionery.
You are, of course, welcome to use shop bought coffee essence, but I've made my own by mixing a couple of teaspoon of instant coffee granules with hot water.
Icing sugar
You will need a little bit of icing (fine, confectionery) sugar to dust your work surface when you are shaping or rolling out the coffee creams. Without the sugar, the filling sticks even when it's firm.
Chocolate
I've used dark chocolate coverture with this recipe, but it's perfectly fine to use milk or even white chocolate. I prefer dark chocolate simply because the filling is already sweet enough (ehm....it's just sugar....), so I want something not too sweet to enrobe it with.
How to make coffee creams - step by step
STEP 1
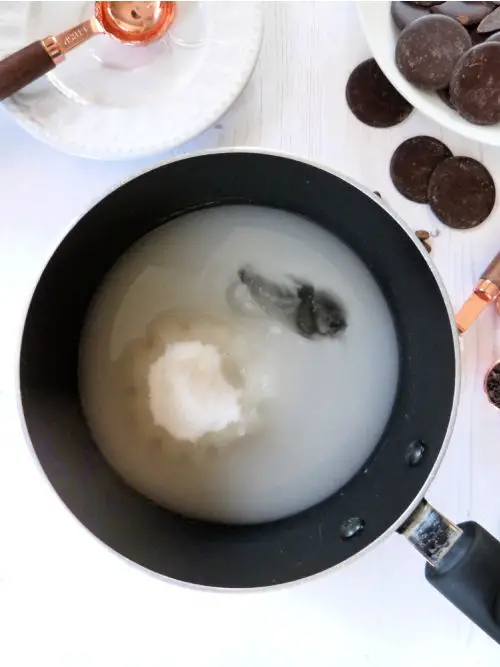
Measure out all the ingredients using a digital scales or use cups and spoons making sure that they are only filled to the level (not heaped). Add the caster sugar into a small to medium size saucepan and add the liquid glucose, cream of tartar, pinch of fine salt and the water.
STEP 2
Slowly heat the mixture to dissolve the sugar and then bring to the boil. Don't start to boil your sugar syrup until all sugar crystals have dissolved. If you do, you'll end up with a gritty confectionery.
To make sure that you don't end up with uninvited sugar crystals in your sugar syrup, brush the sides of the saucepan with hot water and and pastry brush to bring down any sugar particles.
Also don't stir the syrup, just swill the whole saucepan in your hands if you want to move the sugar around to dissolve. This stops you from using the same mixing spoon that you've just used putting back into the saucepan with re-crystalised sugar.
To check that you are ready to boil your sugar, use clean spoon and dip it into the sugar syrup. If there are no sugar crystals visible, you are ready to go. To double check, run your finger over the spoon, you'll be able to feel if there are any crystals as sometimes air bubbles can look like crystals.

STEP 3
Boil until the syrup reaches 114C and then pour straight into heatproof bowl and add the coffee extract or flavouring.
To make your own coffee flavouring, use about 2 teaspoons of instant coffee granules with about 1 teaspoon (or little more) of boiling water. Stir to dissolve and add in about 2-4 teaspoons (depending on how strong you want your coffee creams to be).
It's difficult to gauge how much to add, especially as every flavouring is a slightly different strength. The sugar syrup will be very hot at this stage, so please don't be tempted to taste it.
Add the flavouring, swill it around and leave it. You'll get the chance to add more flavouring once the mixture cools down and you'll be able to actually taste it.
STEP 4
Leave to cool the mixture at room temperature for 10 minutes, until the mixture has thickened a little and develops a skin covering the surface. This very much depends on how cold or hot your kitchen is and where you place your sugar syrup to cool down.
I have a marble cutting boards, which I normally use, but I found that the mixture cools down way too quickly and unevenly. This creates problems later on, so recently I've been using regular wooden chopping board.
If you leave the mixture to cool down too much, it will crumble and look very dry, when you get to the whisking step.
It can be counteracted by adding water, flavouring or even alcohol to make the whole mixture a bit more pliable. I do this right at the end when I've nearly finished the recipe, just before I want to roll it out and shape.
STEP 5
Using a hand-held electric mixer, beat the syrup until it thickens and becomes a smooth thick paste. This will take about 3-5 min at slow to medium speed. Once it starts to get very thick, remove the fondant from the bowl and knead it by hand until it’s silky and smooth.
At this point, the mixture might be still very hot (especially in the middle), so wear catering/plastic gloves, or be very careful when you knead the syrup.
Cover with cling film and leave to rest for few hours or overnight.

STEP 6
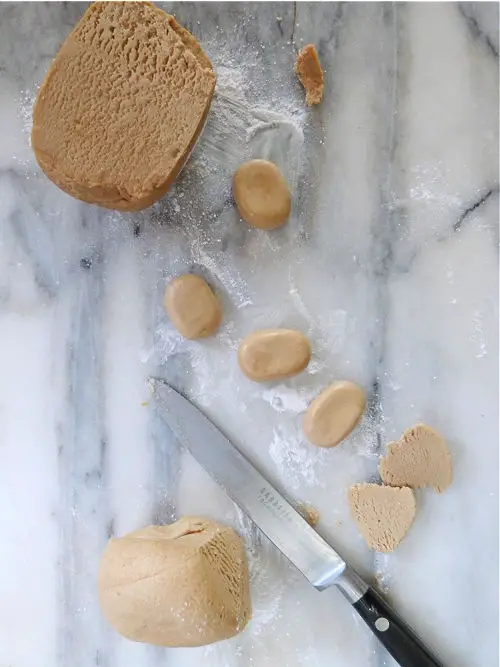
When ready to continue, lightly dust the work surface with icing sugar and roll the fondant out to a thickness of 2-3mm Using a cookie cutter, stamp out rounds or squares and place these on a parchment-lined tray. Chill for 20 minutes.
If you don't have a cutter or you want your coffee creams to be more round and domed, simply take a piece, roll it to a very small ball, flatten it gently and make it more of an oval shape.
Place on a surface dusted with an icing sugar to prevent the creams from sticking.

STEP 7
Next step is to temper dark or milk chocolate. We do need to temper chocolate to make sure that our fondant creams look perfect and without any white streaks.
If you are not familiar with this technique, then you can follow my easy version of chocolate tempering, without having to worry about the chocolate melting temperature. You can also temper chocolate with cocoa butter, but for now we will follow the simplified version.
Melt the chocolate in a microwave (or in a bowl set over simmering water in a saucepan) in 10 seconds intervals, steering the chocolate after each interval. Let the chocolate to melt only half way (when most of the chocolate has melted, but there are still some chocolate buttons remaining) and then take it out of the microwave (or away from the simmering saucepan). Stir slowly until all the chocolate has melted away.
If you have a digital thermometer, you can check the chocolate temperature - it should be somewhere around 32 Celsius for dark chocolate, 29 Celsius for milk chocolate and 27 Celsius for white chocolate. If you are above those temperatures, carry on stirring until the chocolate cools down a bit. If your temperatures are lower, return the chocolate to the microwave (or saucepan) for 5 seconds at the time.
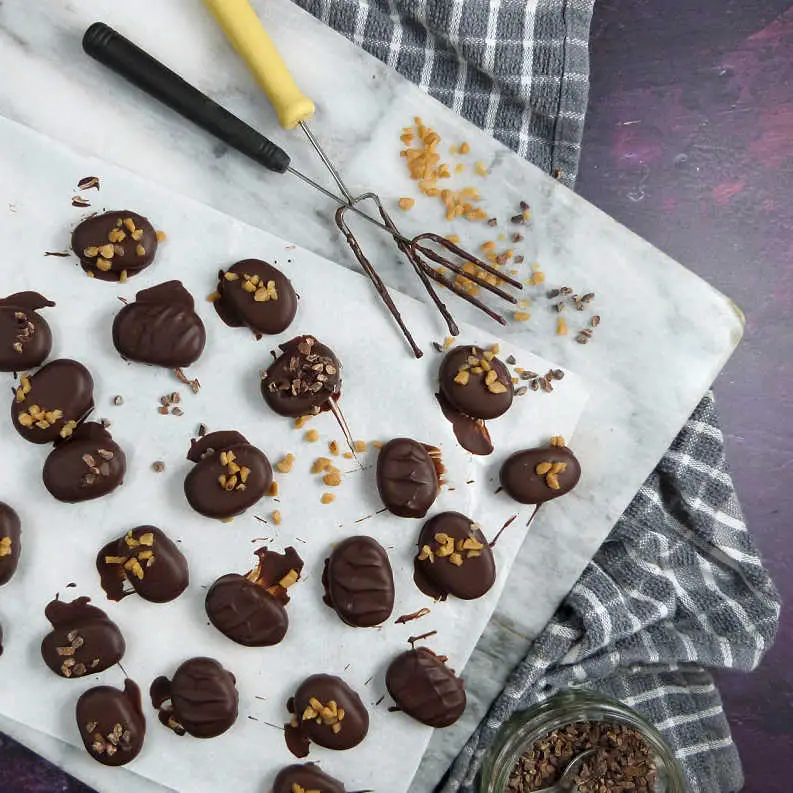
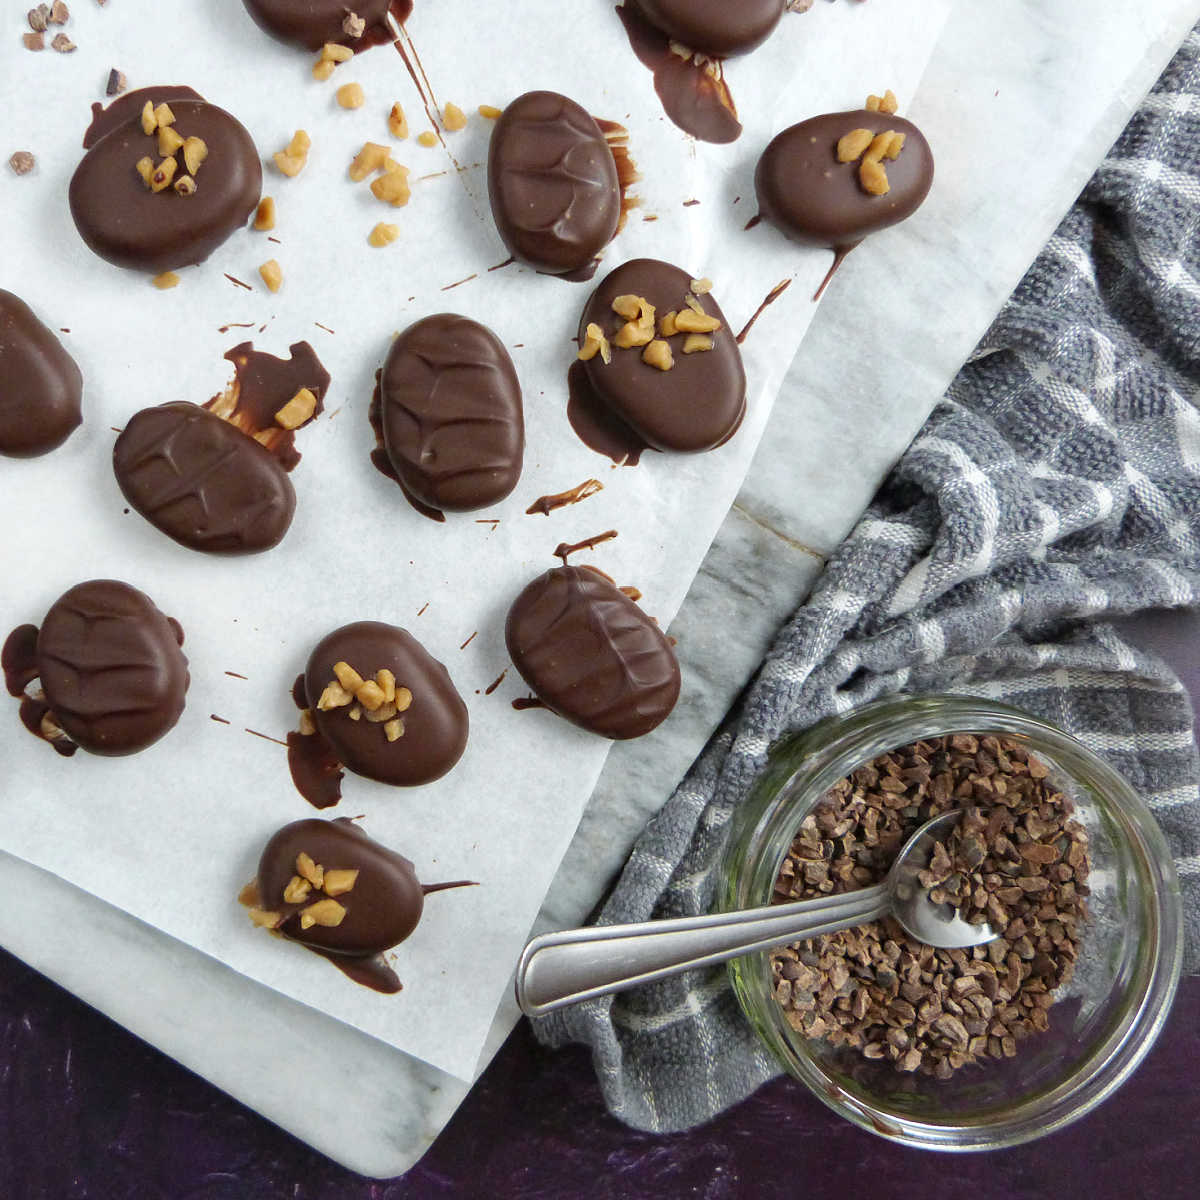
Dip each fondant cream in the melted chocolate using kitchen fork (or specialist chocolate dipping fork). Lower the fork with the fondant into the chocolate and then as you are lifting the fondant tap out the excess chocolate.
Dip the coffee creams to fully cover and decorate with pieces of ground coffee, cocoa nibs or a drizzle of white chocolate.
The chocolate might start to thicken as you dip your fondant creams, so you might need to return it to the microwave or warm it up again over a saucepan of simmering/hot water.
Leave to set in the fridge for 15-20 minutes.
Fondant creams flavour variations
The best thing about this recipe is that you can easily make it with different flavours. Pretty much anything goes, but here are my favourite combinations.
You can make your own flavours, like with the coffee granules or use good quality food essences or extracts. Depending on the quality of your flavour essences, you might need only 1 teaspoon of the flavouring instead of the 2 teaspoons that the recipe has.
You could also infuse the water with flavour or start with fruit flavoured water instead of regular water, but be careful as the boiling of the sugar can change the flavour (and usually makes it more caramelised than you need).
I've also used a bit of alcohol instead of water when I needed to make the sugar syrup more pliable just before I rolled it to create this confectionery.
Since I mixed the alcohol with the cold mixture, the coffee creams had a faint smell and taste of whisky. Combined with a really dark chocolate, the flavour was amazing!
- Orange
- Peppermint or Mint
- Rose
- Violet
- Lavender
- Chocolate
- Strawberry
- Raspberry
Batch size
This will depend on the size of your coffee fondant creams, but if you use size slightly bigger than a sugared almonds or like a date size - slightly flattened, you will have approximately of 40-50 coffee creams with this recipe.
Can I scale up or down this recipe?
Scaling down is a bit tricky as you'd need to use a smaller saucepan and make sure that you use an adequate size stove/burner ring to boil your sugar on.
It's not impossible, but it's tricky not to burn small amounts of sugar. It is also a little more difficult to whisk the sugar as the mixture will cool down a lot quicker.
Doubling up this recipe is a little easier, but do bear in mind that you'll need to adjust all of these (up!)
- Saucepan
- Size of stove ring
- The time it takes to boil the mixture
- Cooling time
- Whisking time
If you are thinking of doubling up the recipe quantity, you can make the fondant and keep it in the fridge (wrapped in clingfilm) for 1-2 days. This allows you to do this recipe in stages and you can do the shaping of the cream fondants and the chocolate dipping over a few days.
Can fondant creams recipe be made in advance?
Yes, these coffee creams make perfect gifts for birthday parties, hen parties or used as wedding favours or Christmas presents for your foodie friends and family. You can make them up to one week in advance, on the understanding that they will be fine for a week or two after that.
How to store chocolate coffee creams
Keep the fondant creams in cool place (not in the fridge) in an airtight box (or tin or paper box) and separate each layer with baking parchment to make sure that the chocolate covering doesn't get scoffed.
Storing fondant creams is the same as storing any other chocolate, - best in a cool cupboard out of direct sunlight, where the temperature doesn't fluctuate. 18 Celsius is ideal temperature for storing chocolate, but it's more important that the temperature doesn't go up or down too much.
You also want to make sure that you don't store your cream fondants near any source of heat, such as cupboard next to the oven or fridge as the chocolate on your fondant creams could potentially melt.
How long fondant creams last?
Your chocolate coffee fondant creams are best eaten within 2-4 weeks, although they won't go off as such.
Fondant creams do have a very long shelf life, and I have kept them for much longer than 4 weeks. What I've noticed is that sugar texture starts to dry out after few weeks and the texture is more crumbly, but the flavour was still fine.
This recipe and me
I've always considered peppermint creams as a bit old fashioned type of confectionery until recently when I got asked for the recipe on several occasions and thought: 'maybe there is more to these than I originally thought!'
I guess when you are spoiled with delicious chocolate most of your life, the idea of eating a lump of flavoured fondant is not that exciting! But, I'm happy to say, I was totally wrong!
We've made the traditional peppermint creams with fresh mint (and a bit of strong peppermint essence) and added a hint of gin. I've paired it with a 85% Madagascar single origin chocolate and the flavour was amazing!
This chocolate coffee creams recipe is my next favourite version, which is totally grown-up treat (especially themed with a dash of whisky). Don't eat them all at once, although it's tricky not too!
Why not stay in touch...
I hope you enjoy making this recipe and if you do, I'd love to know what you think! Let me know in the comments below or find me on Instagram or Facebook and add the hashtag #cocoaandheart so that I can see your post.
Or why not subscribe to my weekly newsletter with new recipes and baking tips straight to your mailbox.
Magdalena

Coffee Fondant Creams
Equipment
- Medium size saucepan
- Thermometer - Digital or Traditional
- electric whisk hand-held or mixer
- pastry brush
- bowls for mixing & melting chocolate
- kitchen fork or chocolate dipping forks
- baking tray lined with greaseproof paper
Ingredients
- 350 grams caster sugar 1 3/4 cup
- 100 ml water 1/4 cup + 3 tablespoons
- 1 tablespoon of liquid glucose
- large pinch cream of tartar
- tiny pinch fine salt
- 2 teaspoons coffee extract
- icing sugar for dusting
- 200 grams tempered dark chocolate 1 cup + 2 tablespoons
Instructions
Making the fondant cream filling
- Tip the caster sugar into a small saucepan and add the liquid glucose, cream of tartar, salt and the water.
- Slowly heat the mixture to dissolve the sugar and then bring to the boil.
- Cook until the sugar syrup reaches 114C and then pour straight into heatproof bowl, add the coffee extract. Swill the coffee extract in, but don't stir.
- Leave to cool at room temperature for 10 minutes, until the mixture has thickened with a skin covering the surface.
- Using a hand-held electric mixer, beat the syrup until it thickens and becomes a smooth thick white paste. This will take about 3-5 min at slow to medium speed.
- Once the coffee cream mixture starts to get thick, remove the fondant from the bowl and knead it by hand until it’s silky and smooth.
- Add more water, essence or alcohol if needed to create a firm sugar dough.
- Cover with cling film and leave to cool down completely for few hours or overnight.
- When ready to continue, lightly dust the work surface with icing sugar and roll the fondant out to a thickness of 2-3mm Using a cookie cutter, stamp out rounds or squares and place these on a parchment lined tray. Chill for 20 minutes.
- Alternatively, roll pieces of the fondant creams in your hands and flatten them a little to create oval shapes.
Melting and chocolate tempering
- Melt the chocolate in a microwave (or in a bowl set over simmering water in a saucepan) in 10 seconds intervals, steering the chocolate after each interval. Let the chocolate to melt only half way (when most of the chocolate has melted, but there are still some chocolate buttons remaining) and then take it out of the microwave (or away from the simmering saucepan). Stir slowly until all the chocolate has melted away.
- If you have a digital thermometer, you can check the chocolate temperature - it should be somewhere around 32 Celsius for dark chocolate, 29 Celsius for milk chocolate and 27 Celsius for white chocolate. If you are above those temperatures, carry on stirring until the chocolate cools down a bit. If your temperatures are lower, return the chocolate to the microwave (or saucepan) for 5 seconds at the time.
Dipping the fondant creams in melted chocolate
- Dip each fondant cream in the melted chocolate using kitchen fork (or specialist chocolate dipping fork). Lower the fork with the fondant into the chocolate and then as you are lifting the fondant tap out the excess chocolate.
- Decorate with cocoa nibs as you go - one coffee cream at the time.
- If your chocolate thickens (cools down) return it back to the microwave for 5 seconds (or warm over the saucepan), stir and continue with dipping your fondant.
- These coffee fondant creams are best eaten within 2 weeks. Keep in cool place in an airtight box and separate each layer with baking parchment.
This recipe was originally written on 1 June 2021 and last tested and updated on 11 April 2023


Love these. Coffee is definitely up there with my favourite flavours and these look so much nicer homemade. x
What delicious looking treats for coffee lovers!
WOW! How good do these look? They are so professional looking too – STUNNING chocolates! THANK YOU so much for linking up to #CookBlogShare week 22 – Karen 🙂