Here is my favourite recipe for traditional Christmas candy cane sweets and since I made these during the Christmas holidays, it gave me the chance to take some detailed photos to show you how relatively simple this recipe is. This recipe is a version with UK measurements.
And if you fancy trying other hard boiled sweets recipes you can follow my tried and tested recipe for traditional sweets right here on my blog, where you will also find my troubleshooting tips for making sweets at home.
Why make this recipe?
- Fun activity to make with children (under supervision – the sugar is very hot!)
- Make different flavours – not just peppermint
- Learn traditional sugar making techniques

MORE TRADITIONAL SWEETS RECIPES
Candy Cane Recipe Making Equipment
As an Amazon Associate I earn from qualifying purchases
Here are the tools and equipment I use to make my traditional sweets recipes. To make this candy cane recipe, you’ll need:

- medium size pan or a saucepan – non-stick smaller to medium size with a lid
- non-stick silicone baking mat – light & useful for baking and traditional sweet making
- or marble chopping board – this will take the heat out of the sugar when you pour it on
- large palet knife (or dinner knife, that you don’t normally use) – for handling the hot sugar
- stainless steel scraper – very useful for moving around the hot sugar mixture
- heat-proof food gloves – perfect for handling hot sugar mixture and pulling the sugar
- or latex gloves with another pair of winter gloves underneath
- or just your bare hands oiled
- wooden skewer to mix in the colour

Ingredients
- 225 g granulated sugar – any type will do
- 50 g liquid glucose – I buy mine online
- 75 ml water
- 1/2 teaspoon of cream of tartar
- 1-2 teaspoon of strong peppermint extract
- Red food colouring paste – I use concentrated extra strong colour
- White gel food colouring paste – optional, but makes the candy canes trully white


You can see that the mixture is not quite white and whilst it gets lighter as you pull it, it doesn’t get brightly white. This is mainly because, whilst trying to take all the photos and make the recipe at the same time, my sugar syrup has been slightly caught by the heat and started to caramelise.
Make sure that when you make yours, the sugar doesn’t get to the stage where it starts to turn yellow in colour. You can also use extra white gel colour, which will make the sugar mixture pure white.
MORE SWEETS RECIPES
How to make homemade candy canes sweets
STEP 1 – MIX THE INGREDIENTS
First of all mix all the ingredients (apart from the colour and peppermint extract) in to a medium size pan and put on a very low heat.
STEP 2 – DISSOLVE SUGAR
After few minutes the sugar starts to dissolve, but if you test it with a wooden spoon, you can still see sugar crystals that are not fully dissolved. Keep it on very low heat and wait a little longer until all is dissolved.
Make sure that they are no sugar crystals on the side of the pan, by brushing them down with pastry brush dipped into hot water.
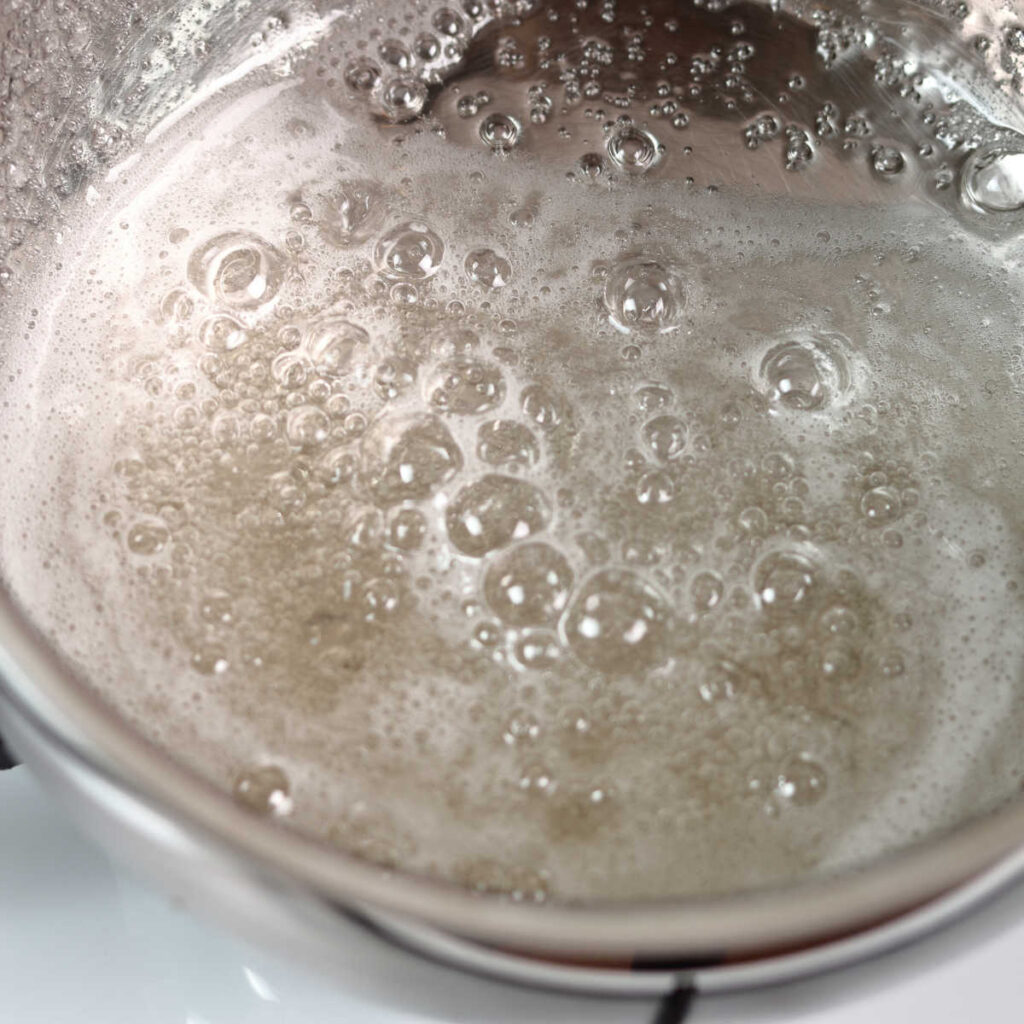
Test the sugar again – this time the spoon is much clearer and the sugar liquid is fairly transparent. Leave it for couple more minutes and then bring the mixture to the boil and carry on boiling on a medium heat. Don’t be tempted to steer the mixture, it would crystallise it.
STEP 3 – HEAT THE SUGAR
Bring the mixture to about 150 C (145-150 depending on the humidity in your kitchen), take off the heat and add your flavour.
STEP 4 – ADD PEPPERMINT FLAVOUR
In this case, since we are making candy cane recipe, I’ve used traditional peppermint flavour.
Depending on the type of your peppermint flavour you might need to add 1-2 teaspoons of the extract. I’ve added 2 teaspoons and the flavour was fairly minty, but not overpowering.
STEP 5 – POUR SUGAR MIXTURE ON THE MARBLE
Now pour the mixture on to a marble slab (or other non-stick, heat resistant surface), which has been covered with oil, to prevent the mixture sticking.
STEP 6 – DIVIDE INTO TWO PARTS
I’ve divided the mixture into two parts – one – large one for the white element of the candy cane and smaller one for the red stripes.
STEP 7 – ADD COLOUR
The smaller puddle of the sugar mixture needs to be coloured with red gel colouring. You only need a tiny amount, which still gives you strong red colour. The large puddle of the sugar mixture is not being coloured, but if you have white gel colour, you can use that.
STEP 8 – PULL THE WHITE SUGAR MIXTURE FIRST
Start by pulling the lighter sugar mixture. You can see that at the beginning the mixture is see-through, but as you carry on pulling and twisting the rope, it gets more and more opaque.
STEP 9 – WARM THE SUGAR IF NEEDED
If at any point the mixture becomes too hard to handle, put it in a microwave for few seconds or to a preheated oven (about 200C) for about 30 sec at a time. Make sure that you oil the microwave plate a little with an sunflower or vegetable oil, otherwise it sticks!
STEP 10 – REPEAT WITH THE RED SUGAR MIXTURE
Repeat the same with the red mixture, only this time don’t pull for so long, otherwise the red becomes too opaque and gets little too light in colour.
STEP 11 – TWIST EVERYTHING TOGETHER & CUT
Now comes the fiddly bit – pull both sugar syrup mixtures to a rope of a same length and start gently rolling and twisting at the same time. Decide on a thickness of your candy cane (about 0.7 cm) and cut to length (about 10-15cm).

How to wrap & store your candy canes
If you want to keep them for a short while, wrap them in cellophane first, twist the ends of cellophane to seal and then gently bend the ends to create the hook. If you don’t wrap your candy cane sweets straightaway, the moisture from the air will start to make them sticky.
If you don’t have cellophane bags or a wraps, use white greaseproof paper or any other greaseproof paper. Plastic or non-greaseproof paper will stick to your homemade candy canes and it will be very difficult to remove.
If you don’t have any wrapping paper or cellophane, use a large jam jar or other airtight container to store your Christmas candy sweets. The humidity in your house will make them eventually softer, but they will keep for a few days.
Why not stay in touch…
I hope you enjoy making this recipe and if you do, I’d love to know what you think! Let me know in the comments below or find me on Instagram or Facebook and add the hashtag #cocoaandheart so that I can see your post.
Or why not subscribe to my weekly newsletter with new recipes and baking tips straight to your mailbox.
Magdalena
This recipe was originally written on 24 December 2017 and last tested and updated on 15 November 2021

Candy Cane Recipe
Ingredients
- 225 grams sugar
- 50 grams liquid glucose
- 75 ml water
- 1/2 teaspoon cream of tartar
- 1-2 teaspoon peppermint extract
- red gel food colouring paste
- white gel food colouring paste
Instructions
- First of all mix all the ingredients (apart from the colour and peppermint extract) in to a medium size pan and put on a very low heat.
- After few minutes the sugar starts to dissolve, but if you test it with a wooden spoon, you can still see sugar crystals that are not fully dissolved. Keep it on very low heat and wait a little longer until all dissolved.
- Make sure that they are no sugar crystals on the side of the pan, by brushing them down with pastry brush dipped into hot water.
- Test the sugar again – this time the spoon is much clearer and the sugar liquid is fairly transparent. Leave it for couple more minutes and then bring the mixture to the boil and carry on boiling on a medium heat. Don’t be tempted to steer the mixture, it would crystallise it.
- Bring the mixture to about 150 C (145-150 depending on the humidity in your kitchen), take off the heat and add your flavour. In this case, since we are making candy cane recipe, I’ve used traditional peppermint flavour. Depending on the type of your peppermint flavour you might need to add 1-2 teaspoons of the extract. I’ve added 2 teaspoons and the flavour was fairly minty, but not overpowering.
- Now pour the mixture on to a marble slab (or other non-stick, heat resistant surface), which has been covered with oil, to prevent the mixture sticking.
- I’ve divided the mixture into two parts – one – large one for the white element of the candy cane and smaller one for the red stripes.
- The smaller puddle of the sugar mixture needs to be coloured with red gel colouring. You only need tiny amount, which still gives you strong red colour. The large puddle of the sugar mixture is not being coloured, but if you have white gel colour, you can use that.
- Start by pulling the lighter sugar mixture. You can see that at the beginning the mixture is see-through, but as you carry on pulling and twisting the rope, it gets more and more opaque.
- If at any point the mixture becomes too hard to handle, put it in a microwave for few seconds or to a preheated oven (about 200C) for about 30 sec at a time. Make sure that you oil the microwave plate a little with an sunflower or vegetable oil, otherwise it sticks!
- Repeat the same with the red mixture, only this time don’t pull for so long, otherwise the red becomes too opague and gets little too light in colour.
- Now comes the fidley bit – pull both sugar syrup mixtures to a rope of a same length and start gently rolling and twisting at the same time. Decide on a thickness of your candy cane (about 0.7 cm) and cut to length (about 10-15cm).
- If you want to keep them for a short while, wrap them in a cellophane first, twist the ends of cellophane to seal and then gently bend the ends to create the hook. If you don’t wrap your candy cane sweets straightaway, the moisture from the air will start to make them sticky.



Leave a Reply